

How-To Guide
How to Connect a Sectional Couch: Identify, Align and Test
To connect a sectional couch, first identify the exact model and connector, then clear and level the area, align the correct module faces, engage the hardware only in the instructed direction, and test the occupied seam. Stop if parts are missing, heights differ or force is required.
On this page
Connect a sectional couch by identifying the exact connector first, clearing and leveling the work area, aligning the correct module faces, engaging the hardware only in the instructed direction, and testing the seam after normal use. Do not buy generic brackets, force mismatched pieces or tip a large section unless the model instructions explicitly require and support that action.
Fast sequence: save the model instructions, inventory the connection parts, photograph their starting position, remove cushions only as directed, align the bases on a level surface, engage the matching pair without improvised force, then test gap, lift and drift. Stop when the connector is bent, loose, missing or unidentified.
Decide whether the sections are meant to connect
Not every modular-looking sofa uses rigid hardware. Some units use brackets, pins, latches or straps; others rely on an anti-slip base or are designed to remain independent. Check the product page, setup guide and underside labels for the selected model. A visible gap does not prove that hardware is missing, and friction alone should not be upgraded with a third-party connector without authorization.
Record the intended configuration. A connector may exist only on specific faces, so two modules that sit beside each other in one layout may not be approved neighbors in another. Finished sides, arms, backs and seat directions belong in the same map.
Identify the connector pattern

Hook or fork with a receiver
One side has a projecting metal or reinforced part that enters a matching receiver. Determine whether the instructed movement is horizontal, vertical or a lift-and-lower action. Check that the pair is at the same height and faces the correct direction before engagement.
Pin, peg or plate system
A pin may drop into a plate or aligned holes, or two plates may overlap. Confirm which part is fixed, which moves and whether a fastener is supplied. Never substitute a screw, bolt or pin by appearance; dimensions, material and load path can differ.
Strap, loop or flexible restraint
A strap may route through a buckle, loop or anchor. Follow the exact path and tension instructions. A strap that is twisted, trapped under a foot or pulled across upholstery can create a new problem even if the modules appear close.
No rigid connector specified
Some foam or boneless modules use floor friction, weight and placement rather than a rigid join. Verify that this is intentional. The correct task is then surface compatibility and drift observation—not inventing a hidden mechanical connection.
Prepare a safe, level work zone
Move tables, cords, toys and loose rugs out of the immediate path. Keep children and pets outside the work area. Plan where cushions and modules will wait without blocking an exit. If a section is large, heavy or awkward, use the number of people and handling method specified by the manufacturer.
Inspect the floor, feet, glides and underside for debris. Allow compressed modules to complete their stated recovery before using height or seam alignment as a final judgment. A tilted floor, folded rug edge, trapped packaging or unrecovered foam can make matching hardware appear misaligned.
Place the instructions where every helper can see them and agree on short movement commands before lifting or sliding anything. Do not use a coffee table, wall or another module as a temporary support unless the instructions name that method. Remove jewelry or loose clothing that can catch, wear appropriate footwear and keep the destination visible. If the piece cannot be controlled through the full movement path, set it down safely and obtain more help rather than rushing the final alignment.
Use the seven-step connection sequence

- Identify: match model, configuration, module labels, connector pairs and current instructions.
- Clear: remove people, pets, loose objects and any obstacle from the movement path.
- Level: verify the floor, rug boundary, feet and module recovery condition.
- Align: bring the correct faces together; match front edge, base height and receiver position.
- Engage: use only the direction and force described. Keep fingers away from pinch zones.
- Test: inspect the seam, controlled lift response and movement during normal sitting and standing.
- Recheck: inspect after the first day, after cleaning and after any move or reconfiguration.
Align the bases before the cushions
Decorative cushions can make a crooked base look finished. Use the structural or bottom edge specified by the product, then compare seat height and front alignment. Do not pull modules together by their cushion covers, piping or loose back pillows.
If the connector cannot reach when the bases are square, stop. Recheck whether the modules are reversed, the wrong faces are paired, a leg or glide is missing, or the product is not fully recovered. Forcing a join can bend hardware, damage upholstery or hide the real configuration error.
Test the completed seam in three ways
Static gap test
Photograph the seam from above and the front before use. Record whether the gap is even and whether seat surfaces remain at the intended height. An exact allowable gap must come from the manufacturer; do not invent a universal number.
Controlled lift or separation check
Use only the test described by the product instructions. Some hook systems confirm engagement with a controlled lift at one edge; other designs may release or be damaged by that motion. If no method is provided, ask the seller rather than improvising.
Occupied movement check
With the work zone clear, sit, stand and change position as the sofa is intended to be used. Watch for drift, noise, height change or a seam that opens. Stop use when a structural connection loosens, a part bends or the arrangement feels unstable.
Disconnect without turning the process into damage
Return to the release instructions. Remove bedding, loose cushions or accessories only as directed. Support the module so the connector is not carrying the full movement, release in the specified direction and store removable hardware in a labeled bag tied to the model record.
Photograph wear or deformation before reconnecting. Do not hammer a bracket flat, lubricate a mechanism, enlarge a hole or replace hardware unless the manufacturer authorizes that repair. A repeat connection problem may need service or a replacement part rather than more force.
Troubleshoot from the symptom
| Symptom | Check first | Stop when |
|---|---|---|
| Connector will not meet | Module order, orientation, floor level, recovery | Faces are wrong or metal begins to bend |
| Front edges are uneven | Feet, rug edge, base alignment, correct neighbor | Leveling requires an unapproved shim |
| Gap reopens | Full engagement, connector pair, floor movement | A part loosens or the seam feels unstable |
| Modules slide together | Whether rigid connectors are actually specified | Adding adhesive or hardware is the only proposed fix |
| Noise after connection | Contact point, trapped object, loose supplied part | Noise accompanies movement or visible damage |
A current Monvane example with an evidence boundary
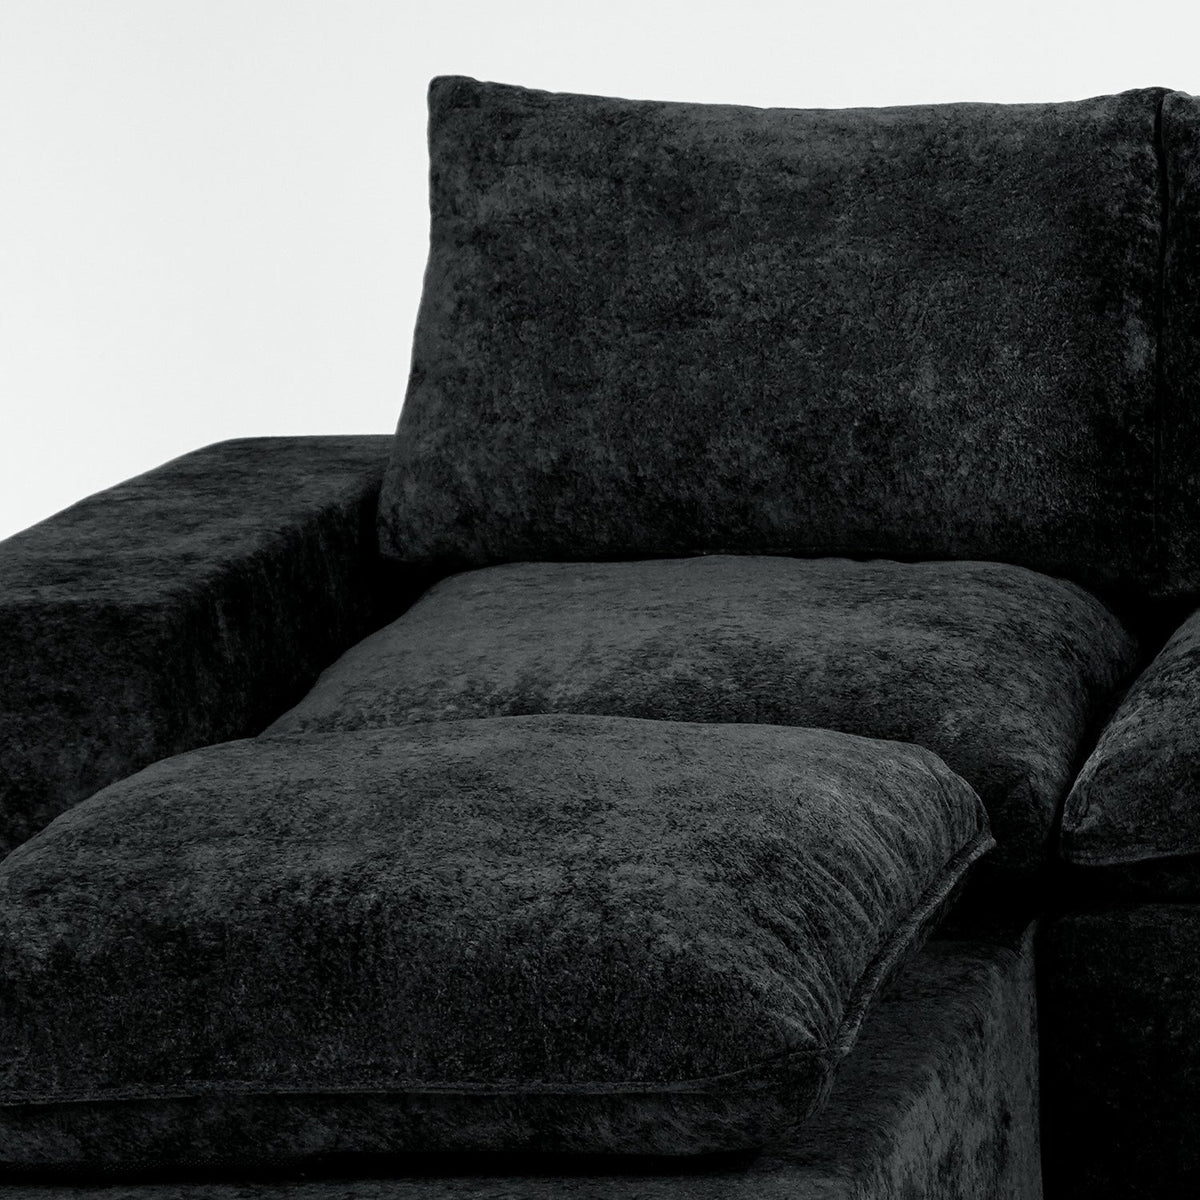
The supplied close-up belongs to the Human & Pet Modular Sofa (4 Seats) archive folder. It visibly shows separate upholstered units and a narrow seam between a seat and forward module. It does not reveal underside hardware, so the image cannot prove how those units connect.
The current Monvane L-Shaped Sectional Couch page says its modules connect and separate easily and that an anti-slip base helps keep them in position. It does not identify a bracket, pin or strap in the current text. Treat the product as model-specific: use its supplied instructions and contact the Monvane Support Center when the physical connection method is unclear.
Questions about connecting a sectional
Do all sectional couches have connectors?
No. Some use rigid hardware, some use straps, and some modular systems rely on placement and anti-slip surfaces. Verify the exact model.
Why will my sectional connectors not line up?
Common checks include module order, face direction, floor level, feet or glides, trapped objects and compressed-foam recovery. Stop before forcing the parts.
Can I add universal sectional connectors?
Only with written approval for the model. Drilling or adding hardware can affect structure, upholstery, flooring and warranty coverage.
How do I keep a sectional from sliding apart?
First determine whether it has a specified connector and whether it is fully engaged. If no rigid connector is specified, follow the product and floor guidance for placement or approved anti-slip solutions.
How often should I check the connection?
Inspect after initial setup, early normal use, cleaning, moving or reconfiguration, and whenever you notice a new gap, noise or movement.
Keep one connection record
Save the model, configuration, module labels, connector photos, instructions, setup date, initial seam photos and recheck notes. That record makes future moves and support requests faster and prevents a connector from being matched by memory.
If the selected system and floor plan are still under review, compare current layouts in Monvane’s modular couch collection. Connection is not complete when the pieces merely touch; it is complete when the exact intended system is identified, engaged and stable in use.